Rightline Gear Sport Car Top Carriers
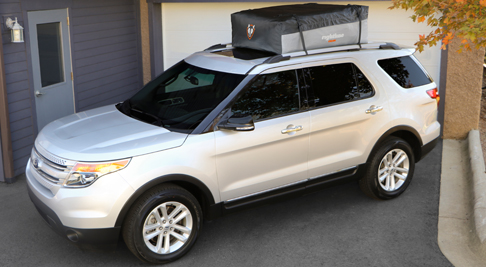
Rightline Gear Sport Car Top Carriers
  • Size: 10
  • Size: 10
  • Size: 15
  • Size: 15
  • Size: 18
  • Size: 18
$89.99 - $109.99
Please select options Unavailable

Details

The Rightline Gear Range Car Top Carriers are 100% waterproof and attach to vehicles WITH or WITHOUT a roof rack. Attach the carrier's straps to a vehicle’s roof rack or use the Car Clips to attach the straps to a vehicle's door frame weather molding. The carriers are constructed from UV protected PVC Semi-Coated Mesh XT. The end result is a highly durable cargo bag that lets you travel with the peace of mind that your gear will stay dry. After use, the Range Carriers fold down for storage in a stuff sack, complete with a sewn-in set up guide. The intuitive attachment method and simplified design of the Sport Carriers make carrying extra cargo easy.
The Range 3 (18 cu ft) is one of the largest car top bags on the market.
The Range 2 (15 cu ft) is a popular size for many travelers.
The Range Jr (10 cu ft) is a good size for smaller cars

Sport Car Top Carrier Design Features

The Sport Carriers’ ZipRight System locates a urethane coated zipper on the protective zipper flap, preventing rain water from entering the carrier. Other roof top carriers feature a standard zipper located where the zipper flap meets the bag, allowing rain water to enter the carrier.


The carriers are constructed from UV protected PVC Semi-Coated Mesh XT and Hydrotuff using Dual Seam Technology. The materials are sewn together for strength and then welded along the stitching to make the seam waterproof. The end result is a highly durable cargo bag that lets you travel with the peace of mind that your gear will stay dry. After use, the Sport Carriers fold down for storage in a stuff sack, complete with a sewn in set up guide.


All of the Sport Car Top Carriers are aerodynamically designed to save $$$ at the gas pump. Use the carriers on your next family vacation, backwoods expedition, shopping spree or move.


The Rightline Gear Sport Car Top Carriers use Dual Seam Technology to bring our PVC Semi-Coated Mesh XT and Hydrotuff Material together. The two materials are sewn together for strength and then welded along the stitching to make the seams waterproof.

PVC Semi-Coated Mesh XT


The Sport Car Top Carrier’s top, bottom, front and back are made from our PVC Semi-Coated Mesh XT, our premium polyester re-enforced PVC. The polyester grid inside the PVC gives it added strength and makes the material resistant to tears or cuts. PVC Mesh is waterproof and perfect for use in a cargo bag as it can be welded to form watertight seams. PVC Semi-Coated Mesh XT is also used in our Cargo Saddlebag Car Back Carrier.

PVC Semi-Coated Mesh XT remains flexible in extremely hot or cold temperatures. It is rated at UPF50 for UV protection, which means it blocks 98% of the sun’s harmful rays. The attractive black color will not fade over time. All of our logos are screen printed on the material and sealed in place. It is difficult to find a durable material that can fold down small for storage, but PVC Semi-Coated Mesh XT meets the challenge (see our stuff sack photo)!

Hydrotuff Material

The Sport Car Top Carrier’s sides are made from our specially formulated Hydrotuff Material. Hydrotuff consists of a 600 denier woven polyester outer layer mated to a PVC inner layer. The resulting combination is a high quality, great looking, waterproof material perfect for use in a cargo bag. Hydrotuff is also used in our Cargo Saddlebag Car Back Carrier.

Hydrotuff Material keeps its properties in extremely hot or cold temperatures. It is rated at UPF50 for UV protection, which means it blocks 98% of the sun’s harmful rays. The material’s color will not fade over time. All logos are screen printed on the material and sealed in place. Hydrotuff Material has been used in our cargo bags for years and has yielded nothing but positive results.

The combination of these two materials make the Rightline Gear Sport Car Top Carriers highly durable and 100% waterproof.

Pack The Carrier

Take note before starting that damage may occur to the carrier if excess material flaps in the wind. The best way to eliminate excess material is to pack the carrier full. If you are unable to pack the carrier full, be sure to fill its front corners, smooth the top, and pull the excess material down over the sides. Hold the excess material securely in place with the carrier’s straps.

Unzip the carrier and place it on top of the vehicle with its non-zippered end facing front.

Load your gear within the aerodynamic shape of the carrier; shorter in the front and taller in the rear (Fig 1). Place sharp edged items in the middle and softer items around them. Close the zipper as you fill the carrier from the front to the rear. Fold the protective flap down to secure the hook-&-loop closures (Fig 1 and Fig 2). Make sure the hook-&-loop closures on the zipper flap completely overlap those on the carrier. If it is difficult to secure the closures, the carrier is over packed.


Attach The Carrier - WITH A Roof Rack

Remove the Car Clips from the (4) attachment straps (Fig 3); the Car Clips will not be used.


Decide if you will be attaching the straps to the roof rack side rails or cross bars. If side rails, the straps will connect to the side buckles (Fig 4). If cross bars, the straps will connect to the front and rear buckles (Fig 4).


Attach each strap by wrapping it around the rack, threading its end through its loop, and pulling tight (Fig 5). Thread the straps up through slot A and down through slot B of the buckles (Fig 6) and tighten the straps evenly.


Tie off the strap ends so they don’t flap in the wind (Fig 7). Make sure to re-tighten the straps after a few miles and check them regularly throughout the trip.

Note: If a strap makes noise while driving, loosen the strap, re-position it slightly, and re-tighten it.

Attach The Carrier - WITHOUT A Roof Rack

Start with the Car Clips on the (4) attachment straps (Fig 8).


Line up the side buckles with the doors of the vehicle (Fig 9). If a 4-door vehicle, (1) strap will attach to the door frame weather molding in each of the (4) doors. If a 2-door vehicle, (2) straps will attach to the door frame weather molding in each of the (2) doors.


Hold the straps with the Car Clips facing towards the vehicle (Fig 10). Thread the straps up through slot A and down through slot B of the buckles (Fig 11).

Open the vehicle’s doors and hook the Car Clips under the door frame weather molding (Fig 12).

Tighten the straps evenly (Fig 13 and Fig 14) and shut the vehicle’s doors over the clips/straps (Fig 15).

Tie off the strap ends so they don’t flap in the wind (Fig 16). Make sure to re-tighten the straps after a few miles and check them regularly throughout the trip.

Note: If a strap makes noise while driving, loosen the strap, re-position it slightly, and re-tighten it.

Re-Connect The Car Clips To The Attachment Straps

Run a strap’s loop through the backside of a Car Clip (Fig 17). Thread the strap’s end through its loop (Fig 18). Pull the strap’s end to tighten the strap around the Car Clip (Fig 19).

Repeat steps 1-3 for the other (3) straps.

Part Numbers

Option UPC MPN Store SKU
10 184633000047 100R50 RIG100R50
15 184633000788 100R20 RIG100R20
18 184633000863 100R30 RIG100R30

Reviews